Properly painting and sealing your fence is essential for maintaining its lifespan and appearance. By taking the time to use quality products and techniques, you can enhance your fence’s security, increase privacy, and improve its overall aesthetic appeal. Whether you have a wood, vinyl, or metal fence, the right maintenance can prevent damage and prolong the life of your investment.
In Riverside, California’s unique climate, regular upkeep is vital. Weather elements like sun and rain can wear down your fence’s finish, leading to fading and degradation. Utilizing high-quality sealants and trusted painting practices from experts at All Counties Fence & Supply ensures that your fence remains functional and visually appealing for years to come.
Understanding the best practices for painting and sealing can save you time and money. You’ll learn about selecting appropriate materials, the importance of prep work, and how to apply finishes for maximum durability. Follow these guidelines to protect your fence while adding to the beauty of your property.
Choosing the Right Paint and Sealant for Your Fence
Selecting the appropriate paint and sealant for your fence is vital for protecting it and enhancing its appearance. Different materials require specific products to ensure long-lasting results. Understanding these options will help you make an informed choice.
Differences Between Paint, Stain, and Sealant
When deciding how to finish your fence, it’s essential to know the differences among paint, stain, and sealant. Paint creates a thick coat and offers a wide range of colors. It can mask imperfections but may peel over time, especially on wood. Stain penetrates the wood, highlighting grain while providing protection. Stains come in transparent, semi-transparent, and solid options. Sealant is a clear finish that protects against moisture and UV rays. It’s especially useful for wooden fences, keeping them looking fresh longer.
Best Types of Paint for Different Fence Materials (Wood, Metal, Vinyl)
For a wooden fence, choose a high-quality exterior paint or stain that includes preservatives. Look for options with mildew resistance to prolong durability. For metal fences, use rust-inhibiting paint designed specifically for metals. This prevents corrosion and extends the life of your fence. If you have a vinyl fence, opt for specially formulated paint that adheres to vinyl surfaces without damaging them. Ensure the paint is UV resistant to prevent fading.
Selecting a Sealant for Maximum Weather Protection
Choosing the right sealant is crucial for protecting your fence from the elements. For wooden fences, a water-based sealant works well, as it allows the wood to breathe. Look for sealants with a long-lasting formula to withstand rain and sun exposure. For metal fences, a sealant that prevents rust is necessary for maintaining integrity. If your fence is made of vinyl, select a sealant that is compatible with vinyl to avoid melting or warping. Always check the manufacturer’s recommendations for the best results.
Preparing Your Fence for Painting and Sealing
Successful painting and sealing of your fence begins with thorough preparation. This step ensures that your fence remains beautiful and protected for years to come.
Cleaning and Removing Old Paint or Stain
Start by cleaning your fence to remove dirt, grime, and old paint or stain. A pressure washer can effectively wash away buildup and debris. Be careful with the pressure setting to avoid damaging the wood.
If paint or stain remains, consider using a paint stripper or a scraper for removal. Make sure to follow the manufacturer’s instructions. After cleaning, rinse the fence and allow it to dry completely before moving on to the next step.
Repairing Damaged or Rotten Wood Before Painting
Inspect your fence for any signs of damage, such as rotting or insect infestation. Pay close attention to the fence posts, as they can be especially vulnerable.
Replace any severely damaged boards or posts to maintain the structure’s integrity. For minor issues, wood filler can repair small cracks or holes. Once repairs are complete, ensure the wood is dry and stable before you start painting.
Sanding and Priming for a Smooth Finish
Sanding is essential to create a smooth surface for painting. Use medium-grit sandpaper to smooth rough areas and edges. This helps paint adhere better and provides a professional finish.
After sanding, remove the dust with a damp cloth. Priming your fence is the next step. Apply a quality primer designed for exterior wood surfaces. This step not only increases paint adhesion but also helps prevent moisture damage.
Make sure to let the primer dry thoroughly before applying your chosen paint or sealant. Following these practices will provide a solid foundation for your fence’s new look and protection.
Step-by-Step Guide to Painting Your Fence
Painting your fence can enhance its appearance and protect it from the elements. This guide will help you understand the tools needed, the best application methods, and important drying times to ensure a successful project.
Tools and Equipment Needed for an Even Coat
Before you begin painting, gather the necessary tools for the job. Here’s a list of essential items:
- Paint: Choose a high-quality exterior wood paint or stain.
- Primer: Use a primer specifically designed for outdoor use if applying over bare wood.
- Brushes: A good brush helps reach edges and corners.
- Roller: Ideal for larger flat surfaces.
- Sprayer: For a smooth and even coating, consider a paint sprayer.
- Sandpaper: Medium-grit for surface preparation and smoothing.
- Drop Cloths: Protect the ground from spills.
- Safety Gear: Use gloves, goggles, and a mask to protect yourself.
Having the right tools will make the process smoother and yield better results.
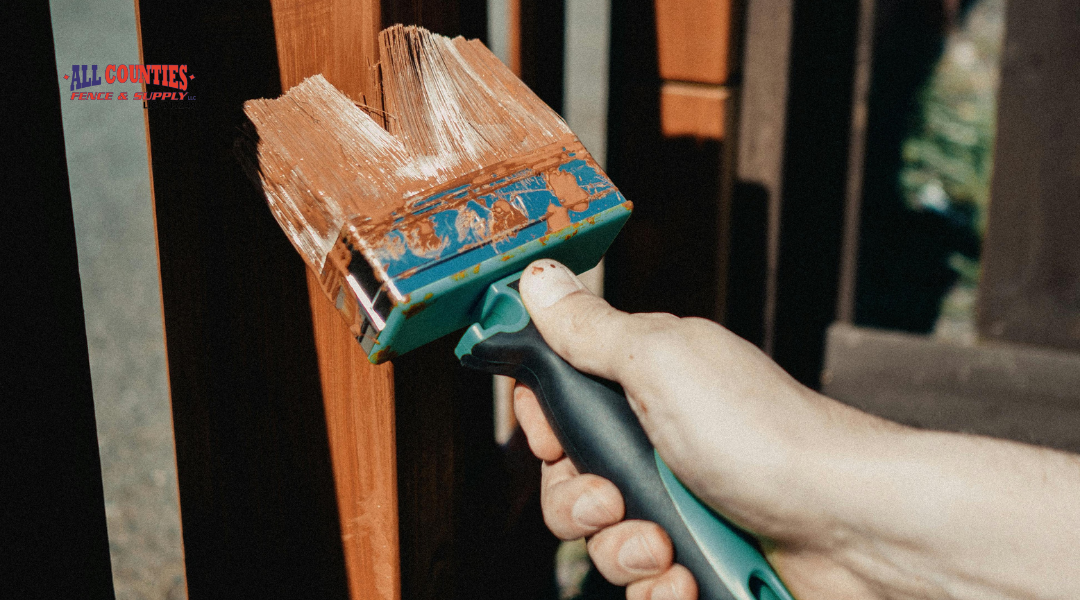
Best Application Methods – Brush, Roller, or Spray
Each application method has its advantages. The choice depends on your fence type and personal preference.
- Brush: Ideal for detailed work, it allows for precision around edges and corners. Use long, even strokes.
- Roller: Best for large, flat areas. It can cover surfaces quickly, ensuring a uniform coat.
- Sprayer: Offers the fastest application. It covers well but requires practice to avoid overspray.
When using any method, work from the top down. This ensures that drips do not mar dry painted surfaces. Ensure you apply even pressure and maintain a wet edge to avoid lines.
Drying Time and Reapplying Coats for Long-Lasting Results
Allow ample drying time between coats to ensure a strong finish. Each paint or stain will have specific guidelines, but a general rule of thumb is to let the first coat dry for at least 4-6 hours.
After the first coat is dry, check for coverage. If you see areas that need more paint, apply a second coat.
Regularly check the manufacturer’s instructions for optimal drying times. It’s crucial not to rush the process, as adequate drying leads to better adhesion and durability.
Proper Techniques for Sealing Your Fence

Sealing your fence is crucial for extending its lifespan and enhancing its appearance. Using the right techniques ensures that the protective coatings adhere properly and provide maximum protection. Here are key techniques to consider when sealing your fence.
When to Apply Sealant – Before or After Painting?
It’s essential to apply sealant at the right time. Generally, you should apply sealant before painting your fence. This allows the wood to absorb the sealant, preventing moisture from getting trapped. If you paint first, the sealant may not penetrate effectively.
If your fence is already painted, ensure the paint is dry and cured before sealing. A suitable protective sealant will enhance the durability of the paint while offering additional moisture protection. Always check product instructions, as some sealants require a specific application order.
Brushing vs. Spraying Sealant for Optimal Coverage
Choosing the right application method for your sealant can affect results significantly. Brushing is excellent for detailed work and provides thorough coverage on textured surfaces. Use a high-quality brush to apply the sealant evenly and ensure it fills cracks and crevices.
Spraying can cover large areas quickly and provides a uniform layer. However, it may require masking off areas to avoid overspray. Regardless of the method you choose, ensure that you follow the manufacturer’s guidelines to achieve the best results. Both methods can work well; the choice depends on your comfort and project needs.
How Often to Reseal Your Fence for Maximum Protection
To keep your fence safe from damage, it’s vital to reseal it regularly. On average, every 2 to 3 years is recommended, but this varies based on regional weather conditions and fence material. If you live in an area with heavy rain or sun, resealing may be necessary more frequently.
Monitor your fence for signs of wear, fading, or peeling sealant. When you notice these signs, it’s time to reseal. A consistent maintenance schedule ensures that your protective coatings remain effective, shielding your fence from moisture and UV damage.
Common Mistakes to Avoid
When painting and sealing your fence, avoiding specific mistakes can save you from costly repairs and maintenance issues down the line. Understanding these errors helps ensure your fence remains attractive and durable.
Painting Over Moisture or Unprepared Surfaces
One common mistake is painting over wet or unprepared surfaces. If your fence is damp, the paint won’t adhere properly, leading to peeling and flaking. Always check the weather forecast to avoid rain shortly after painting.
Before applying paint, clean the surface to remove dirt, mold, or old peeling paint. Use a pressure washer for deep cleaning if necessary. This step ensures your new paint bonds effectively, increasing its lifespan.
Using the Wrong Type of Paint or Sealant
Choosing the wrong paint or sealant can also create problems. Not all paints are designed for outdoor use or for the specific type of wood in your fence. Make sure to select a product that is UV-resistant and waterproof.
For example, oil-based paints provide excellent durability, while latex paints are easier to clean and apply. Always read the manufacturer’s recommendations to find the right match for your materials to avoid frequent repaints and enhancements.
Neglecting Regular Maintenance After Painting and Sealing
Even after painting and sealing, regular maintenance is vital. Many people overlook this step, thinking their newly painted fence will last indefinitely. Routine inspections are essential to spot potential issues like weathering or damage.
You should reapply sealant every few years, depending on your climate and the wear on your fence. Additionally, promptly address any signs of damage or wear to prevent further deterioration and costly repairs. Regular maintenance keeps your fence looking great and functioning well for years.
Maintaining Your Fence After Painting and Sealing

Once your fence is painted and sealed, proper maintenance is essential to ensure its longevity. Regular care will help you keep your fence looking good and functioning well throughout the years.
Routine Cleaning to Prevent Mold and Mildew
To maintain a well-kept fence, perform routine cleanings at least twice a year. Use a gentle soap solution and a soft-bristle brush to scrub away dirt, grime, and organic matter. This helps prevent the growth of mold and mildew, especially in damp areas.
Rinse thoroughly with water to remove any soap residue. Pay special attention to shaded areas where moisture can linger. If you notice any mold, treat it immediately with a mixture of vinegar and water or a commercial mold remover. Keeping your fence clean is a key part of fence maintenance.
Touch-Ups and Recoating to Extend Lifespan
Even a low-maintenance fence requires occasional touch-ups. Inspect your fence every few months for any areas where the paint or sealant may be worn or chipped. Address these spots promptly to prevent further damage.
Reapply the paint or sealant as necessary to protect against the elements. Typically, you should plan on recoating every 3 to 5 years, depending on your local climate and the type of finish used. A well-maintained fence will resist deterioration and last longer, saving you money in the long run.
Seasonal Care Tips for Harsh Weather Conditions
Each season brings unique challenges for your fence. In winter, snow and ice can cause damage. Keep the area around your fence clear of heavy snow to prevent stress on the wood or materials.
During summer, ensure proper drainage to prevent water pooling near the base. Fall is an excellent time to inspect your fence for any wear and do touch-ups before winter sets in. Regular inspections will help you catch issues early and keep your fence in optimal condition year-round.
Final Thoughts and Expert Recommendations
When painting and sealing your fence, proper preparation is key. Start by cleaning the surface to remove dirt and debris. Make sure the wood is dry before applying products.
Choose high-quality paint or sealant. Look for products designed for outdoor use to ensure durability. Using the right tools will make a difference, so consider a brush or sprayer for even application.
Here are some expert tips:
- Apply in dry conditions: Aim for a day without rain and temperatures between 50°F and 85°F.
- Use a primer: This helps paint adhere better and allows for a more vibrant finish.
- Apply multiple coats: For more protection, two coats of sealant or paint is recommended.
After application, keep an eye on your fence. Regular maintenance like cleaning and touch-ups will extend its life.If you have concerns about the process, consider consulting professionals like All Counties Fence & Supply. They have years of experience and can offer tailored advice for your specific needs in Riverside, California.